Setting Up a Static Page with Hugo, Cloudflare, and Umami Analytics
Published on
Contents
This post serves as a historical record of the tools I used to set up my webpage in the form of a tale (along instructions on how to set things up), so it’s written in a linear way, just as I would tell anyone how I made it!
I will try to keep it updated as I change tools or find new ones that are better suited for my needs.
Introduction
I have been asked by some colleagues and family how I made this webpage, how did I do to make it extremely fast, how am I hosting the page, or how am I tracking the analytics, among other questions. I decided to write a guide to help them and anyone else interested in setting up a static website using Hugo, Cloudflare, and Umami Analytics.
This guide is designed for beginners and intermediate users (you will need at least some coding knowledge) who are looking to create a fast, secure, and easy-to-maintain website without diving deep into complex coding. I will try to make the guide as simple as possible so that anyone can follow it.
By following it, you will learn how to:
- Choose and customize a Hugo template for your site.
- Purchase and manage a domain from Namecheap (or any other registrar).
- Set up Cloudflare DNS for robust and reliable DNS management.
- Deploy your static site using Cloudflare Pages for continuous integration and deployment.
- Integrate Umami for privacy-focused website analytics.
The only cost involved is the domain registration, which is around $10-15 per year - depends on the domain. All other tools and services mentioned in this guide are free to use. 🫰🏻
Whether you’re creating a personal blog, a portfolio, or a simple business site, this guide will help you get started quickly and efficiently. If you have any questions, feel free to contact me directly!
Requirements and [why/why not] other tools
We are going to use the following tools to set up a static website:
- Hugo: A static site generator that allows you to create web pages from Markdown files.
- Namecheap: A domain registrar where you can purchase and manage your domain.
- Cloudflare: A cloud-based platform that provides DNS management, CDN services, and more.
- Cloudflare Pages: A platform for deploying static sites with continuous deployment.
- Umami: A simple, privacy-focused analytics tool for tracking website visits.
- GitHub: A version control platform where you can host your Hugo site.
Why Hugo?
When I started to make websites, I saw pages made with Wordpress, Google Sites, and other CMS. I was tempted to use WordPress, but I found it too heavy for my needs and would need to pay a hosting site (this is almost always the case unless you do an on-premise setup, aka. self-hosting the service).
I wanted a fast, secure, and easy-to-maintain website that required some sort of bond with coding. JavaScript, React (Gatsby, Astro, Next.JS, …) and etc. would imply me spending a lot of time learning them properly, which I don’t have really the interest since I come from a backend background.
That’s when I discovered static site generators. I saw Jekyll, but I found that Hugo was better at the time, and I fell in love with it. It is fast, easy to use, and has a lot of themes to choose from.
One of the things that Hugo provides numerous benefits:
- Ability to create pages from Markdown files. This is very useful because I can write my posts in Markdown and then Hugo will generate the HTML files for me. I can focus on writing and not on the HTML structure of the page (although I can customize it if I want).
- It’s based on Golang which makes it fast and provides some Golang scripting capabilities inside the HTML/CSS/JS files. This is very useful because it lets the developer use for loops, if statements, and other programming constructs inside the files.
- It’s open-source and has a great community. If you have any questions, you can ask in the Hugo forums, and you will get an answer quickly.
Why Namecheap?
At first I bought my domain from GoDaddy which was nonuser.es since nonuser.com was already taken. Then I wanted to change my domain to this of now, and bought it with Google Domains. However, Google Domains was taken down not long ago, and I decided to move to Namecheap since the price was good, I had heard good things about it and it’s one of the biggest domain registrars in the world. I’m very happy with the service they provide as of now.
However, you can use any domain registrar you want. The steps will be similar.
Why Cloudflare?
I started using Cloudflare because it provides a free tier that includes DNS management, CDN services, SSL certificates and some analytics (we’ll talk about this in the Why Cloudflare). It also offers a great integration with Cloudflare Pages, which is the platform I use to deploy my static site as of a few days ago 😂. It also offers a lot of other services like DDoS protection, firewall, and more. You should check them out!
Why Cloudflare Pages and Why Umami?
Sorry to have mixed both products, but I think it’s better to explain them together as in my specific case, the history involves both.
I started using GitHub Pages to deploy my site. Then transitioned to Netlify but I had some problems and decided to go back at GitHub Pages.
GitHub Pages is great, it will provide HTTPS for free and domain support. It also comes with the ability to use GitHub Actions which you can use to deploy your site automatically and add some other features such as checking broken links, checking issues with Google Lighthouse, etc.
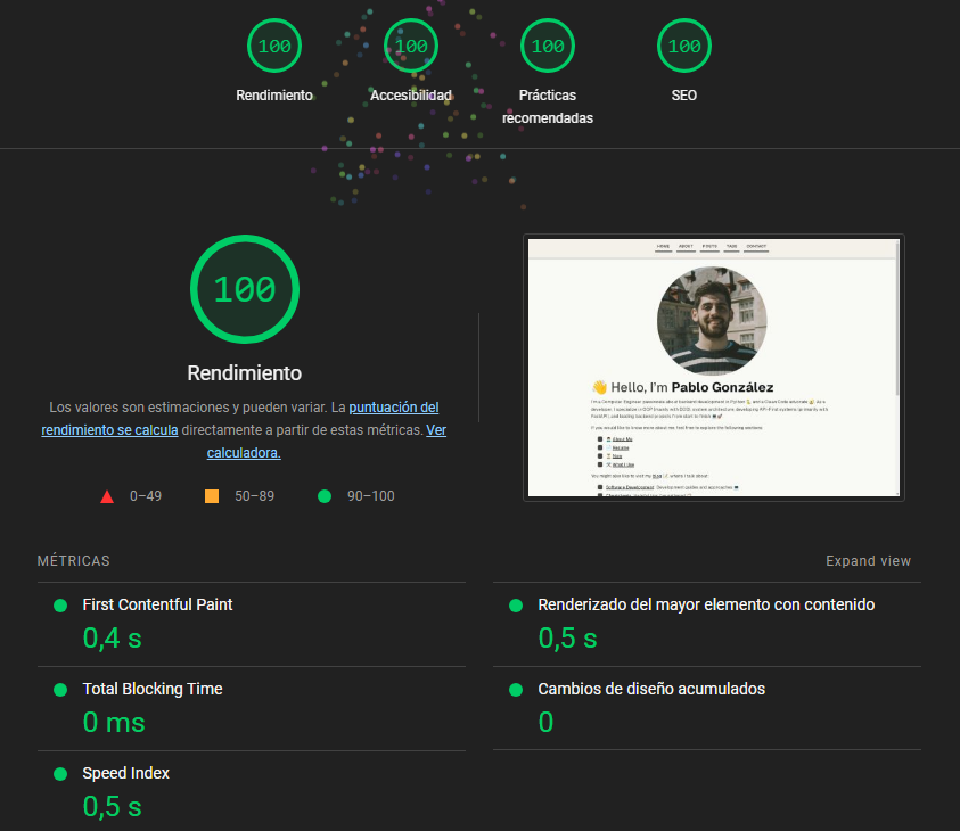
Not too long ago I was using GitHub Pages, and my webpage was using Google Analytics. The performance of the page was not the best as Google Lighthouse told me, and decided to get rid of Google Analytics. In this process, I found out that I still wanted to have some basic analytics to know how many people were visiting my page, from where, and what was the most looked at content.
I found out that Cloudflare provided some basic analytics in their free tier, and decided that it was a good idea to use them.
The same day, I found that Cloudflare Pages integrates better with other Cloudflare products, and that GitHub Pages didn’t allow to use the Cloudflare Proxy features as seen in this post and this other post. So it was a no brainer to change.
It also provides a free tier that allows you to deploy static sites with continuous deployment so I decided to make the change. It’s easy to set up and use, and it’s very fast. You don’t need to worry about the infrastructure nor creating any CI task, you just need to push your code to GitHub and Cloudflare will take care of the rest.
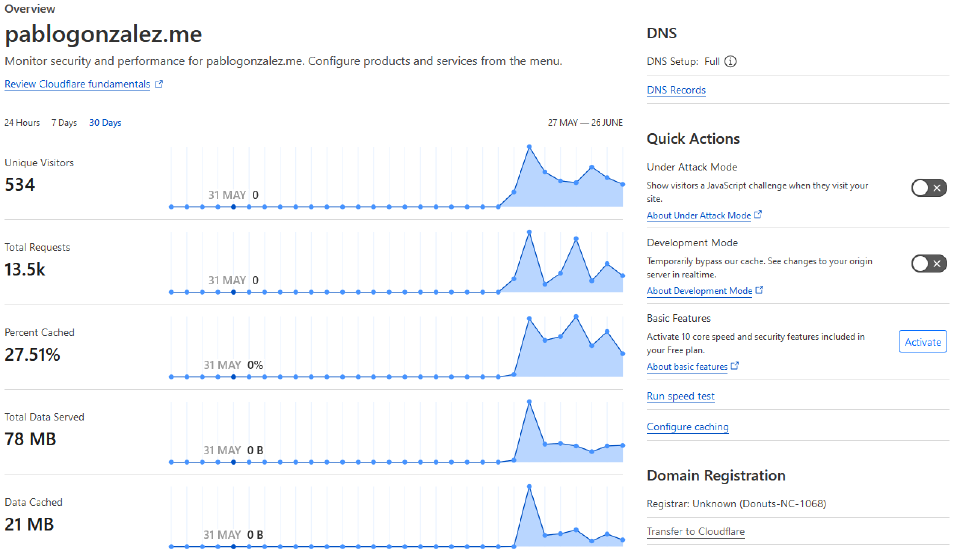
Going back to the analytics… after a while, I was seeing crazy numbers (like you can see in the image below) that weren’t real visitors but maybe bots, crawlers and what not.
So I decided to take a look back at JS scripted analytics that were privacy-focused, easy to use, fast, and that I could host myself or were free at least.
I researched a bit and saw many possibilities: Plausible, Fathom, Heap, HotJar, MixPanel, Woopra, Simple Analytics, Umami, Clicky, Open Web Analytics and Matomo. As you can see, there are lots of them. I thought of hosting Matomo in my Intel NUC Server but a Reddit post changed my mind because some Matomo users changed to Umami and decided to go with the flock of sheep.
Umami is really good because it’s open-source, privacy-focused, easy to use, and most important… FREE 🤑.
The other services will be very good, I’m not saying they aren’t, to say more, I even asked GPT4o (which I use a lot daily) to give me a comparison table (down below) so I could look at them thoroughly. But I decided to go with Umami because it was the best for my needs.
| Feature | Heap | Clicky | Matomo | Hotjar | Mixpanel | Woopra | OpenWebAnalytics |
|---|---|---|---|---|---|---|---|
| Price | Free tier; paid plans | Free tier; paid plans | Free self-hosted; paid cloud-hosted | Free tier; paid plans | Free tier; paid plans | Free tier; paid plans | Free |
| Hosting | Cloud | Cloud | Cloud or self-hosted | Cloud | Cloud | Cloud | Self-hosted |
| Ease of Setup | Easy | Easy | Moderate (self-hosted) | Easy | Easy | Moderate | Moderate (self-hosted) |
| Features | Event-based tracking, retroactive analysis | Real-time analytics, heatmaps | Comprehensive analytics, GDPR compliance | Heatmaps, session recordings, feedback | Event-based tracking, user flows, A/B testing | Real-time analytics, customer journey mapping | Basic web analytics, customizable tracking |
| GDPR Compliance | Yes | Yes | Yes | Yes | Yes | Yes | Yes (self-hosted) |
| Custom Events | Yes | Yes | Yes | No | Yes | Yes | Yes |
| Real-time Data | Yes | Yes | Yes | No | Yes | Yes | Limited |
| Heatmaps | No | Yes | Yes | Yes | No | No | No |
| Session Recordings | No | No | Yes | Yes | No | No | No |
| User Segmentation | Yes | Yes | Yes | Yes | Yes | Yes | Limited |
| API Access | Yes | Yes | Yes | No | Yes | Yes | Yes |
| Integration | Wide range | Wide range | Wide range | Limited | Wide range | Wide range | Limited |
Any way, this is just my experience, in case you prefer to deploy the site in another page, you can check more about how to do it in the Hugo documentation.
Choosing and Setting Up Your Hugo Template
I initially built my website using the Cuppy template and later transitioned to the Color Your World template from Hugo. Over the years, I’ve made various aesthetic changes to keep the site fresh and engaging.
- Select a Hugo Template: Start by choosing a Hugo template that suits your needs. You can find many free templates in the Hugo themes directory. There are a lot of them, it just depends on what you are trying to build.
- Install Hugo: Follow the official Hugo installation guide to set up Hugo on your local machine.
- Create a New Site: Use Hugo commands to create a new site and apply your chosen template, or follow the instructions that will probably be in the template (most likely). Detailed instructions are available in the Hugo documentation.
- Customize Your Site: Modify the template files, content, and configuration to personalize your site. Hugo uses Markdown files to generate pages, making it easy to add and update content on the fly.
As a reference, when I want to see how my page looks as I’m editing it, and be able to see the changes in real-time from my PC or my phone, I use the following command:
hugo server --minify --bind 192.168.1.18 --baseURL http://192.168.1.18:1313
In Linux you could use this too, makes life easier:
IP=$(ifconfig | sed -En 's/127.0.0.1//;s/.*inet (addr:)?(([0-9]*\.){3}[0-9]*).*/\2/p')
hugo server --minify --bind $IP --baseURL http://$IP:1313
You could even make an alias in your .bashrc or .zshrc file to make it easier to run the command.
For more Hugo CLI commands, check the Hugo CLI documentation.
Registering Your Domain with Namecheap
Although I use Namecheap, you can choose any domain registrar that you prefer. The steps will be similar.
- Purchase a Domain: Go to Namecheap and register your desired domain.
- Manage DNS Settings: In your Namecheap account, navigate to the domain list and select the domain you want to manage. Set the DNS to point to Cloudflare’s nameservers. Go to the next section for more details on this step.
Setting Up Cloudflare DNS
Cloudflare provides robust DNS management and integrates seamlessly with Cloudflare Pages.
- Add Site to Cloudflare: Sign up for a Cloudflare account and add your domain.
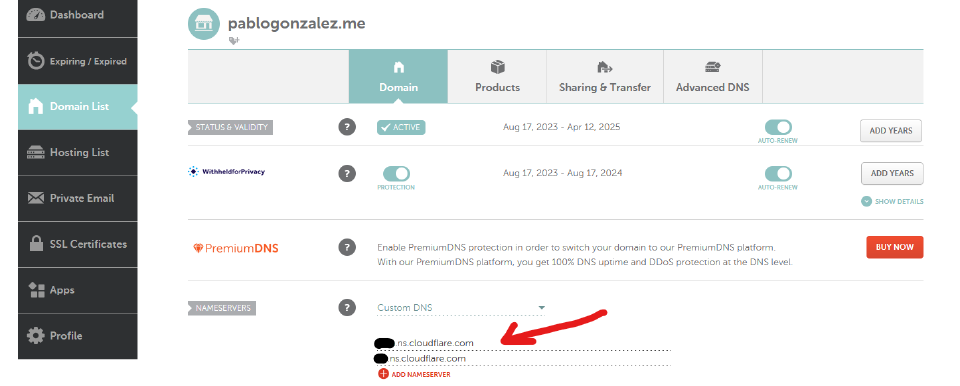
- Update Nameservers: Follow the instructions to update your domain’s nameservers to those provided by Cloudflare. It’s very straighforward, you just need to copy the nameservers from Cloudflare and paste them in the Namecheap dashboard.
- Configure DNS Records: In the Cloudflare dashboard, configure your DNS records to point to your website’s hosting setup. It will probably take almost all DNS records from Namecheap, but be sure to check them because if one is missing, your site could not work properly. This is, because this migration deletes the DNS routes from Namecheap and creates them in Cloudflare. Look at the references for more information.
References:
- Cloudflare guide on how to change your nameservers
- Namecheap documentation on how to set the DNS records for Cloudflare.
Deploying with Cloudflare Pages
- Create a Cloudflare Pages Project: In the Cloudflare dashboard, navigate to the Workers & Pages section and create a new project. Connect it to your GitHub repository where your Hugo site is hosted.
- Build Settings: Configure the build settings for Hugo.
- Typically, this involves setting the build command to
hugo --minify -b YOUR_DOMAIN- If you were to use CloudFlare domain, it would be
hugo --minify -b $CF_PAGES_URL - In my case it would be
hugo --minify -b https://pablogonzalez.me/
- If you were to use CloudFlare domain, it would be
- And specifying the output directory as
public.
- Typically, this involves setting the build command to
- Set Environment Variables: As Hugo evolves, I like to set the
HUGO_VERSIONenvironment variable to the version I’m using. This ensures that the build process uses the correct Hugo version. Check the releases page on the Hugo GitHub repository to find the latest version. Be sure that your website works with the latest version before updating it.
Integrating Umami for Analytics
Umami is a simple, privacy-focused analytics tool that integrates well with static sites.
Did you know Umami is a Japanese word that means “pleasant savory taste”? 🍣
- Create an Umami account and follow the steps to set up analytics for your website. They are pretty straightforward and involve adding a tracking code to your site.
- Set Up Umami: Follow the Umami steps when adding your website (hosted version). Or you could self-host it, in which case you would need to follow the Umami install guide
- Add Tracking Code: Insert the Umami tracking code into your Hugo template. This is usually done in the
headsection of your HTML files.
This is an example of one:
<!-- Umami Analytics -->
<script defer src="https://cloud.umami.is/script.js" data-website-id="some-hash-here-hehe"></script>
<!-- End Umami Analytics -->
Conclusion
Setting up a static website with Hugo, Cloudflare, and Umami is a streamlined process that offers you the possibility of having your own page!
While I’ve provided a high-level overview, I encourage you to refer to the official documentation for each tool as they offer detailed, up-to-date instructions.
Please, feel free to reach out if you have any questions or need further assistance and I mean it!!!. If there’s any doubt, I’ll make sure to update this post with the answer so that it can help others in the future.
Happy building! 🛠️